DIY : Reconstructing Sweat Pants

Hey y'all!
Its been such a long time since I've posted a DIY post.
I've been trying to find easy DIYs and Tutorials to post up so everyone else can try it out too.
So for today's post, I will be reconstructing (fixing) a pair of sweat pants.
I'm not sure if reconstructing is the right word but anyways, lets get started!
First, these are the things that you need :
- Sweat Pants (matching colour of your choice)
- Measuring tape
- Pencil or a marking chalk
- Scissors
- Seam Ripper
- Sewing Machine (if you have one)
OR
- Matching Thread
- Needle
(For hand sewing if you don't have a sewing machine)

If you can see, this part of the pants looks like crap pretty bad.
This sweat pants actually belongs to Roy and he bought it for roughly around RM169 from Grace Point in Suria Sabah Mall. Only after 2 washes, the material at the bottom just ripped and there was no way of saving it unless I replaced the bottom part of the pants.
This material that they used was like a cheap mesh kind of material which I hate the most and I knew it was gonna tear after a while. After this happened, I asked Roy to pass me any matching sweat pants or sweat shirt so I can cut off part of it and replace it with it.


I went ahead and seam ripped the part that needed to be replaced and this took quite a while to remove. I chose not to cut off the pants because I want it to look like it was never reconstructed before.
This process took me around 40 minutes.
Be sure to keep the bottom part aside for measuring purposes.
This will help you to find out how long you need before you cut off the other sweat pants that
will be sewn on later on.
This process took me around 40 minutes.
Be sure to keep the bottom part aside for measuring purposes.
This will help you to find out how long you need before you cut off the other sweat pants that
will be sewn on later on.

Alright, now we have that part seam ripped and detached from the pants,
we can move on to cutting the sweat pants

So first thing I did was, I laid the bottom piece on top of sweat pants B to check the width and length differences. The width was just a little short by 0.5cm but it was fine for me.
As for the length, bottom of Sweatpants A was 12 inches long but I wanted to make it longer for Roy
because he is pretty tall and the previous length was slightly shorter.
I decided to measure 13 inches in length AND I added an additional 1 inch seam allowance for me
to sew on just in case it was still too short or if I made any mistakes.

Once you're happy with your measurements, draw a line using a pencil or a chalk marker
to mark where you want to cut. I cut off one side first then folded the pants over to trace on the
other side that needs to be cut as well.
to mark where you want to cut. I cut off one side first then folded the pants over to trace on the
other side that needs to be cut as well.

It should look like this!
Don't throw away the remaining piece of the sweat pants.
Fold in the raw edges and sew them into a pair of shorts!
Don't throw away the remaining piece of the sweat pants.
Fold in the raw edges and sew them into a pair of shorts!
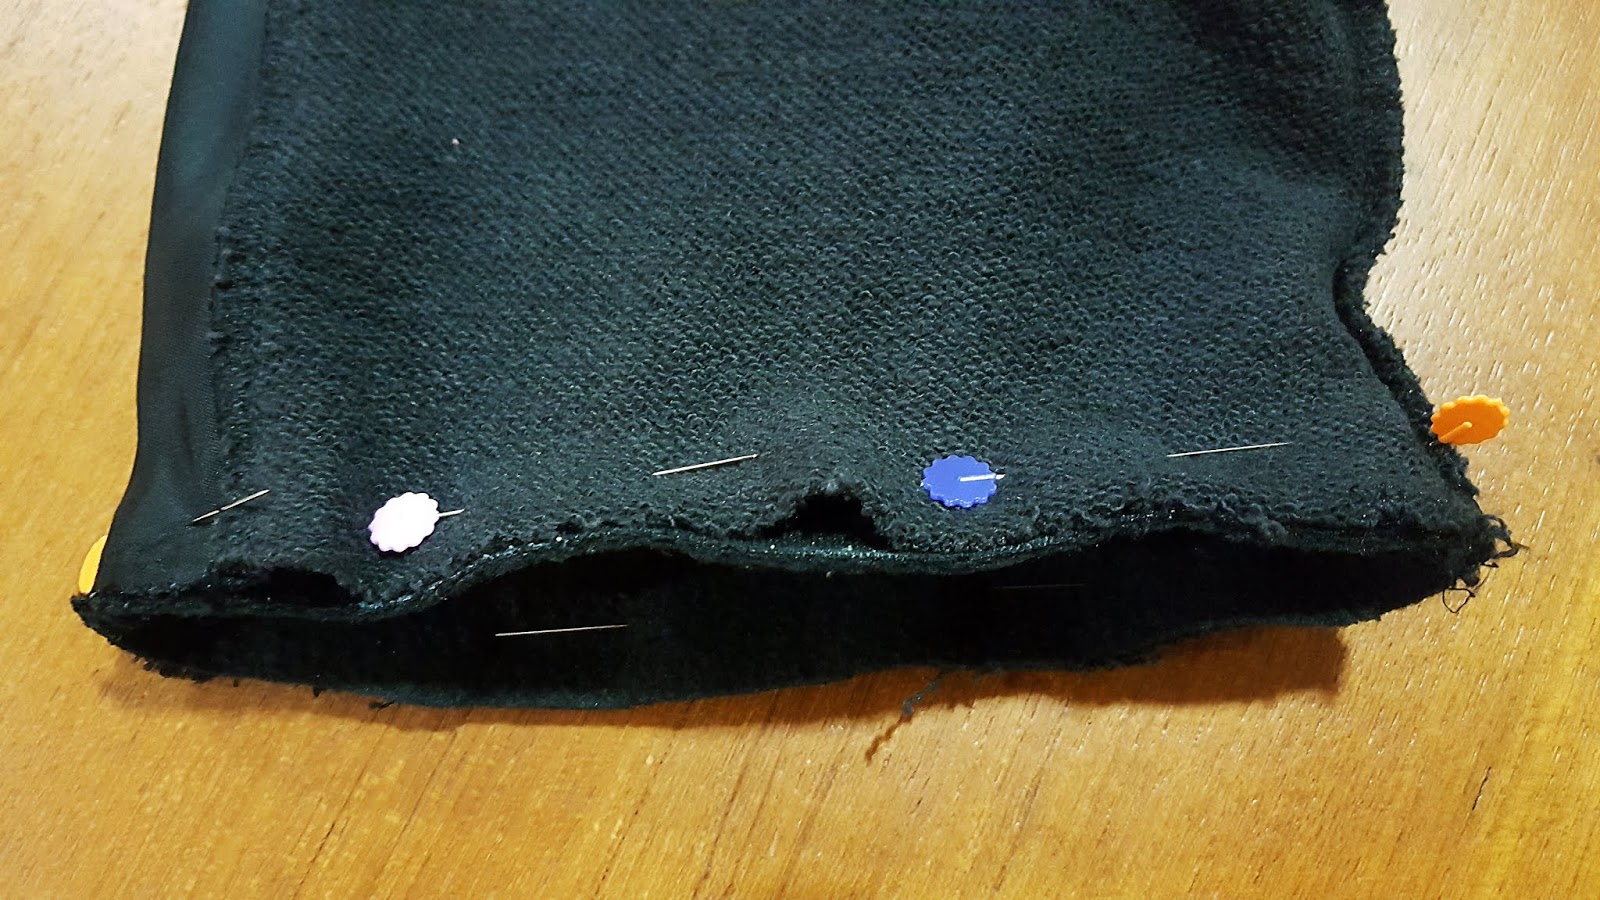
Once you have 2 pieces of the bottom part, go ahead and pin then right sides together.

Be sure to pin the side seams together first.
What this means is that, you need to match the center of the pants together first.
How do you do that?
First, you fold your pants into half and use a pencil or pin to mark the center and same goes for the bottom piece that you cut out. Find the center for the bottom piece and pin them to the center marking on sweatpants B.

This is how it should look like.
 Once you've done that, go ahead and pin around the entire piece.
After all that measuring and cutting, its time to move over to the sewing machine!
After all that measuring and cutting, its time to move over to the sewing machine!

I set my machine to the zigzag stitch.
(or overlock stitch. I cant remember the name for this stitch)
While sewing this, be sure to stretch out the pants JUST A LITTLE.
Not too much because you don't want the stitches to be too loose once the pants goes back to its original form.
Be sure to backstitch everytime you start AND end your sewing project.
This is to prevent the stitches from coming undone.
FOR HAND SEWING :
You can just do a straight stitch but I would suggest doing two lines across instead of just one just in case it comes undone. To make it more secure, you can do a small blanket stitch just to close off the raw edges.

It should look like this!
That was pretty easy right?
That was pretty easy right?

Go ahead and flip the pants inside out and you're done!
The colour is a little off but its not that obvious when its worn.
The colour is a little off but its not that obvious when its worn.

And there you have it!
A pair of reconstructed pair of sweat pants.
I know my explanations are pretty long but hey, I'm doing my best to guide you while trying this out.
I hope this was helpful for some of you guys and for those who are new to sewing,
welcome to the world of sewing. Its not as hard as you think it is.
It just takes a bit of practice and you're good to go!
If you have any questions,
feel free to leave them down in the comment section below and
I will do my best to answer them!
Comments
Post a Comment